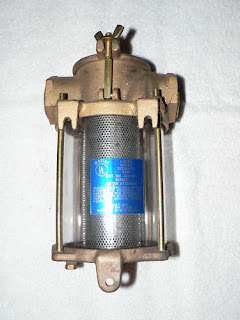
We were half way through our August 2017 cruise to some south Salish Sea destinations. All had gone so smoothly. Real smoothly!

At the half way point I had decided to inspect the fluids in the engine room of the boat. We were in the Poulsbo marina right at the foot of the town. The oil, coolant, battery water and the sea strainers all needed checking. Pulling the starboard strainer's lid off I noticed it had very little caught in the cylindrical stainless steel basket inside. There seldom ever is. Afew tidbits of Eel Grass and some other goo. Nothing to worry about at all. Still, I had it open so I cleaned it out.
Reinserting the basket and replacing the lid, I tightened up the two wing nuts that held the lid tighly to the lower part of the strainer. As I twisted it a bit with my pliers to make sure it was seated tightly I felt the bolt give way. It had seperated at its base from the stainless steel rod that held it to the strainer. It was not something that can be fixed nor is it something that can bebroken and still run that engine. I later learned that those two wing nuts are meant to be tightened by hand only. Not with a wrench!
Without that bolt in place and tightened down there would be no sea water running through the starboard engine to help keep it cool. Plus, sea water would fill the bilge and we would eventually have a sinking problem.
What to do? Our friend and boating mentor, Mike McEvoy was one of our boating buddies on this trip and I asked him to take a look at the problem. He had two suggestions.
1. Send Leslie to the chandlery in town to try and find a replacement part. We handed her the broken bolt and off she went.
2. Mike suggested perhaps trying to tighten the liddown with either zip ties or some stainless steel wire he had. He crawled into the engine bay and ran some wire under the stainless steel rod that usually held the bolt in place and up through the hole in the lid the bolt usually ran through. Cinching it down tight and giving the wire a good twist, things were looking good. He also ran a couple of heavy duty zip ties through the same holes and cinched those as tight as possible.It looked good but we needed to start the engine and run it to make sure the strainer wouldn't leak under load.

I started the engine and we waited...and waited. No problems. I reved the engine up a few more RPMs and waited...and waited. Still no issues. Finally, I brought the engine up to about 2000 RPMs, the fastest I would probably need to run it on the return trip home. We waited and watched. Still no problems. Apparently the system doesn't operate under much pressure if any at all. It held with no leaking at all.
By this time Leslie had returned from the chandlery with the replacement parts. $20 got us the new bolt and stainless rod. We decided if the temporary fix held it would be better to wait to do the permanent fix in our home port where we could get our mechanic to fix it if we coldn't ourselves.
We kept an eye on the the sea strainer as we left town in the morning to see how it went underway.
As we traveled along, I checked every 45 minutes by opening the engine hatch and looking for any leaking. Nothing! After a few hours of this I began relying on the engine temp gauge instead and checking the engine compartment at the end of the day for any noticable leakage. Nothing. The bilge was as dry as it always is.
So, now we are home and tomorrow morning I will head down to the boat to replace the wire and zip ties with the new bolt. I think I have the task figured out as I have given it a lot of thought. We'll see.
More to follow!


