March 7, 2017. It's rainy, cold but not cold enough to snow today. My newest mechanic is on board the Key of Sea as well as myself. He's draining the 10+ year old engine coolant from both engines and refilling it with fresh stuff. We were concerned that what drained out would look bad and show signs the cooling system might be in trouble. Turns out that the coolant came out looking good on the port side and a little dirty on the starboard side engine. The mechanic figures that the starboard side may be because it wasn't changed last time because getting to the drain plug is a real pain on that side.
Anyway, the good news is that it was in good shape indicating their is probably no issue with that system. Also, he was able to get the drain plugs off both sides with no trouble. There was concern that they may have to be cut off and new ones installed which would have added a lot more to the cost of the job. So, we've dodged two big bullets so far in this annual maintenance.
Next up is the oil change. This should be pretty straight forward so I am not expecting any problems here.
Finally, the fuel filters have to come off and be replaced. I had a new Racor secondary filter system installed a couple of years ago and also had them moved aft so they'd be easier to access. Plus, the new system requires filters that are easier to find and less expensive. The primary filters are attached directly to the side of the engines like an oil filter on a car. These filters are easy to find even at some car parts stores.
The biggest issue in doing the work is getting at the parts of the engine needing getting to. The engine room is not designed for anything but a pretty small guy and certainly not for a big guy like me. Crawling on hands and knees, over support beams crisscrossing the space and doing it in a greasy, smelly dark space is not my idea of fun. So I'm pretty happy having someone else down there doing the work.
The new mechanic has spotted several items that he asked if he could fix or double check like the hose clamps and the loose alternator bolt. I appreciate that he is that conscientious.
When all this is finished, hopefully today, the boat will be mechanically ready to take out on the water. Sort of like the check up an airplane mechanic does to a plane on a regular schedule, you do this because you don't want any surprises, especially at the the very worst of times. There's nothing worse than an engine failure when you're in rough water or trying to get through a rapids
So, the final report is that all is well with the boat mechanically ecept for the need for replacing the two raw water pumps within the next year or two. The pumps each cost 700 and itll be about thatmuch more to have them installed. Its always something.
Meanwhile, we are ready to go for the season. Now we begin to plan where we'll go.
Friday, March 10, 2017


Monday, March 6, 2017
Fast Charge - Dual USB Charger Socket Mount Project
Another of my summer 2016 projects was to install a USB charger on the flybridge near the helm. As I often use my ipad and the Navionics app to navigate, it uses up the ipad's battery before the day is done leaving me with no power to use the ipad for other tasks later in the day. And, as the engines are shut down, charging the ipad becomes a real problem.

A boating friend, thank heaven for them, told me he had installed one of the fast chargers and it made all the difference.
It is made locally here in Bellingham. I liked that. So I drove over to the factory and was actually able to meet the engineer who designed it. He gave me plenty of tips for installing it. Pretty simple really.
Here is the Blue Sea website where you can look up the device and its specs. They cost about $45.
It's an "intelligent device" meaning it will rapidly charge a phone, tablet or other mobile device much quicker than normal USB charging plugs. It also has an internal filter to prevent it from interfering with your GPS Chartplotter or VHF radio which may be nearby on your helm.
It was an easy hole to drill using a hole saw through the face of the helm and then only required that it be wired into the circuit breaker system behind the main helm. Run the power wire up to the and connect to the charger.
flybridge
It is waterproof with a plastic cover that hides the dual USB plug.

A boating friend, thank heaven for them, told me he had installed one of the fast chargers and it made all the difference.
It is made locally here in Bellingham. I liked that. So I drove over to the factory and was actually able to meet the engineer who designed it. He gave me plenty of tips for installing it. Pretty simple really.
Here is the Blue Sea website where you can look up the device and its specs. They cost about $45.
 |
| Hole Saw |
 |
| The finished project |
flybridge
 |
| Schematic for installation |
My First Marine Plywood Project
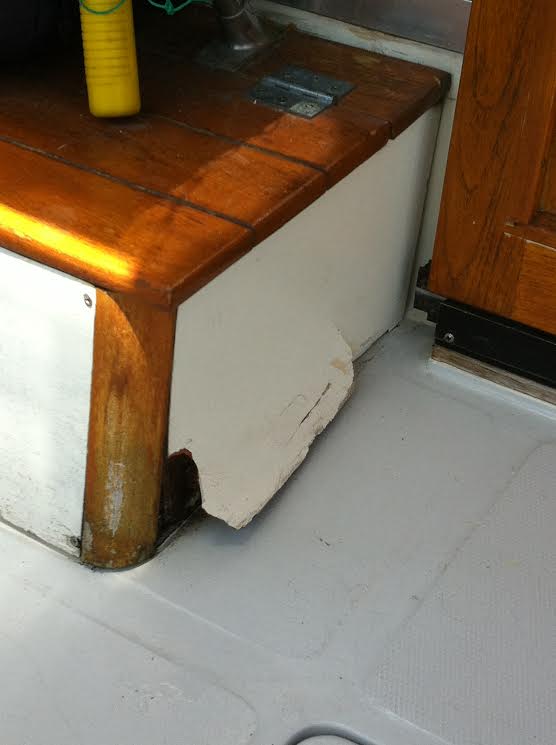 |
| Original damaged area |
Well, like every project I undertake that requires some talent as an electrician or a plumber or a carpenter or mechanic, it IS a big deal.
However, in the past I have found that in many instances, patience, a lot of careful study and going at it slowly, usually results in success. Thus, I began the process of learning what I needed to do to make this little project work and along the way I learned a lot.
The small 10 by 15 inch panel was rotting and as it was very visable, it got to look really bad. At least it looked bad to me. I noticed it everytime I boarded the boat. I'd cuss the thing a bit under my breath, shake my head and tell my wife I have got to figure out how to fix that.
 |
| Tearing into the project, I found more rot. |
So, I started by doing a lot of research on line. I posted a question on the Bayliner Owner's Club's question forum, and asked questions of boating friends. Slowly the planning portion of the project came together. I found I needed to purchase some specific tools I didn't have. I needed specific materials to do the job, marine plywood, epoxy, brushes, gloves, sandpaper, etc.
 |
| 2 X 4 foot piece of marine plywood |
 |
| Measure five times, cut once! |
At $50 for a half sheet of marine plywood, I really wanted to get this right the first time. I purchased a square and a finishing blade for my skill saw and began measuring, checking, rechecking, double checking, thinking through every move I made to get just the right shape drawn onto the plywood. Then I carefully started making each cut, stopped, looked over what I'd done, remeasuring again. Then on to the next rip.
When I'd finally got the final cut done, I took the raw piece of wood down to the boat to see how it fit. Close, but not quite perfect. Back home, I shaved a bit more off one end to account for the height difference from front to back. Another trip to the boat and it looked nearly perfect. Pretty darn close for an amateur trying this for the first time.
I pulled the teak wood trim pieces off the locker, sanded and revarnished them over several days.
 After carefully sanding the new panel with finer and finer grits, finally ending with double 00 steel wool, I cleaned it carefully with tack cloth, a product I had never used before. It basically picks up every bit of the dust and wool left behind from the sanding process making it more likely you'll get a smooth finish when applying epoxy and your final finish.
 |
| Finished panel! |
All edges of the new panel have been painted with the gooey epoxy and left to dry before the second coat was applied. Careful sanding of the epoxy prepared it for painting. I found a deck paint made by Rustoleum that went on beautifully. Not a brush stroke is visable. A couple of coats of this and the panel was ready for installation.
The biggest problem was getting all the trim pieces back in place and the entire locker put back together. The finished product turned out so nice I almost suprised myself. I point it out to everyone who comes aboard and they politely compliment me but I know they are probably thinking that such a piddly little repair is kind of silly. But I am proud and so is my wife. And the boat looks so much better when I climb aboard.
I know there are more places aboard that will need this same treatment sooner than later but at least I know I can do it when the time comes.
 |
| My plan and measurements on top of the rotten panel |
Friday, February 24, 2017
Some New Camera Gear
 |
| Battery grip |
I've wanted one of these battery grips for quite a while as well as the WU-1b wi-fi accessory and a dual battery charger, all pictured here. The battery grip adds a bit more heft to the camera which I actually like. The camera body is a bit small for my hands so this helps a lot. It also houses two batteries expanding the battery capability significantly.
The dual battery charger is pretty much self explanatory. It replaces my original single battery charger since with the twin battery grip device, I need to be able to get both batteries charged at the same time.
 |
| WU-1b wi-fi device |
The WU-1b is a little wi-fi device that allows me to send photos from the camera directly to my ipad for processing, Its pretty slick. I had decided not to buy one at first because I'd read some reviews that didn't think it functioned very well. I found it at a good sale price so I decided to give it a shot. I've been very impressed. It does exactly what it is supposed to do and does it consistently.
 |
| dual battery charger |
All on Amazon, I got free shipping and have been very pleased with the purchases. My next camera purchase will be a lens that allows me to take macro photos.They are kind of expensive so I may opt for some macro rings instead to see if they are any good. And one day, I'd like a nice long lens for taking good photos of distant objects. If we make any plans for a safari to Africa, I will most definately insist we take one of these along with us.
Boat Maintanance Time

The DIY approach will save you hundreds of dollars, possibly even a boat buck or two. BUT! This approach is also a bit dangerous since you are relying on your own abilities in the engine room to do the work properly, not to mention getting into the often cramped space inside the hatch.
Boats are generally designed for passenger comfort and too often the engine space is somewhat of an after thought. As long as the engine can fit in the allowed space, the boat builder is happy. I've even seen boats built in such a way that there is literally no way to pull the engine out of the boat in the event that it becomes necessary, and inevitably it will. These boats were literally built around the engine. To remove it you have to cut open the top of the boat adding thousands to the project cost, not to mention the lost time in the water.
This spring my boat, the Key of Sea, has the typical need to replace the engine oil and filters, fuel filters, transmission oil, raw water impellers and the possible added project of replacing the raw water pumps. Current approximate estimate to have all this work done by a professional mechanic--$2,700. I'm getting a second opinion on the work by a mechanic of another boat buddy of mine. I'm also thinking about options such as replacing one of the pumps this spring and the other one next spring. The pumps are $700 each not including the labor.
I am also looking at what work I might want to take on myself. I think I can handle the raw water impellers and the fuel filter replacement. Engine oil is a bit bigger deal. Some parts are a little too far out of the way for me to reach. Hmmmmm
 All of this AND other projects I want to get on such as repairing the leaky dinghy, replacing some rotting wood on a seat bench on the fly bridge and then there is the cleaning of the boat; pressure washing it, washing, waxing all needs to be done.
We want to take her out on a shake down cruise at the end of March to Anacortes with our Power Squadron buddies. But, no way unless we can get some of this done ahead of the event.
Meanwhile, the weather isn't really cooperating as it is still very cold (it even snowed today and is scheduled to again a couple more times over the next several days. I can't handle the cold weather when having to be a contortionist for hours at a time. Come on spring!
Thursday, February 23, 2017
Introducing the Newest Member of the Family!
 |
| Breakfast out with Gammy and I |
Any way, excuses aside, on Febraury 11th 2015, our daughter and son-in-law delivered a beautiful little girl they named Evelyn Elise Abbott. We call her Evie as in Eve with an extra e on the end--Eve-ee!
We knew she was on the way of course though we had no idea whether she would be a girl or boy. We are certainly thrilled.
When Nick, my son-in-law, called minutes after Evie was born, I told him I would be right there. Right there was the hospital in Ballard and it was an hour and a half from our house. Still, as soon as the call ended I was in the car to drive down and about an hour and half later, Evie was in my arms. Where was grandma? At a music conference on the other side of the state. She wasn't able to meet our girl until a day later when I could pick her up and bring her to the house.
 |
| Aboard the boat last summer |
It has been an amazing experience this past two years. I never knew what being a grand parent would be like. In short, it is an indescribable experience. I can try to describe it (I won't) but anyone who is not a grand parent can't possibly understand the experience or the overwhelming love.
 |
| A very recent photo |
We just celebrated her second birthday and her second Christmas both of which she was thrilled with. The Christmas story this year is worthy of a posting all by itself.
In short, she is the star of the show, our heart beat, our love and adored by all who meet her. She is adorable (of course we think so, but she really is) and really smart. Oh, yeah, she's coming to visit next week for a couple of days. Can't wait!
Crossing the Canadian Border
This summer Leslie and I will spend time on the Key of Sea cruising through the Canadian Gulf Islands just north of the U.S. border. We've done this tice before but always with a group of other boaters in what is known as buddy boating. It's a great way to get more comfortabe with the ins and outs of boating in general and boating further a field, building confidence along the way.
Last summer we left the Key of Sea home and drove up to Port Mc Neill on Vancouver Island and boarded some friend's boat for a cruise through the Broughton Islands. We didn't gain much in personal confidence but were witness to our friend's confident ways aboard their boat.
Though we have no plans to venture as far as the Broughtons this summer, going it alone for the first time so far from home will surely be a mixed experience. We have a better idea of how o prepare to go, where we might want to go, how to plan and what to do when entering some of the more popular anchorages.
Speaking of anchorages, we have yet to anchor anywhere in Canada. Despite cruising there twice now, our cruising buddies have always invited us to 'raft up' to their much larger boat and hang out with them, often sharing dinner and using their dinghy when exploring an anchorage or going ashore. So, to a great degree, we've been the victims of parents who spoiled us and now we don't know how to confidently anchor on our own.
So, we plan to take the Key of Sea out on several shake down cruises closer to home and give ourselves some anchoring opportunites, It'll also give us the opportunity to lower our dinghy and gain some confidence using it to get ourselves where we need to go, whether just going ashore, exploring an anchorage or even stern tying.
That final option of stern tying is a practice commonly used in Canada when anchorages become crowded and your boat's swing at anchor needs to be controlled. After dropping your anchor, you back down the boat towards the shoreline and tie off the stern of the boat to a spot on shore. This technique keeps your boat from swinging on the single anchor point usually used effectively providing much more room in the bay or cove for other boats to anchor. Often times you can identify these stern tie spots on shore in the form of a metal ring attached to a large rock or some other marking ashore indicating an appropriate spot to tie up. While tying to a tree on shore is tempting, unless it is dead, it is not acceptable as the line rubbing againat the bark can cause permanent damage over time. Another concern is making sure you have enough line to rech the shore and back. It is generally recommended to have 300 to 600 feet of yellow polypropylene line stored in a reel of some type. Yellow and polypropylene because it floats and makes it more visable of other boaters. We keep our line in a garden hose reel like the one above. It keeps the line out of the way when not in use and the top of the reel makes a nice table for drinks. We keep it between the two chairs in our cockpit so we can gaze out at the world, read and enjoy our coffee in the morning or a more powerful beverage at the end of the day.
As we are most comfortable tying up for the night in a marina, I am sure our plans will include a lot of these stops.heading north we have had great experiences such harbors as Sidney, Gorge Harbor, Montague Bay, Nanaimo, Ganges, Maple Bay, Chemainus, Telegraph Harbor, and Pirates Cove, just to name a few. Many of these spots have marinas with power and water, shopping and restaurants which, for the small cost of the moorage, gives you most of the comforts of home. It's also a place where you can do laundry, dispose of trash and recycling and get some wi-fi time.
In case you missed it, I didn't mention emptying the waste tank, that holding tank for the toilet. In U.S. marinas you pull up to a dock with a special vacuum device that empties this tank. However, in our experience, most Canadian marinas either have no pumps at all or they are out of order. So the rule of thumb is that you are allowed to pump this waste overboard. I know, awful thought, There are rules for where this can be done. The marina or a bay or cove are NOT places where this is allowable. Open water locations such as a strait or open passage is acceptable. Most boats up this way have what is called a macerator pump
and a "Y" valve plumbed into the waste tank. Once you cross the border into Canada, this Y-valve and macerator pump can be used. In the U.S. however, if boarded by the Coast Guard or other law enforcement, you must have the Y-valve in the off position and tied close. In Canada, with the valve open, a simple flip of a switch will turn the pump on and empty that tank in a matter of a couple of minutes out the side of the boat.
There are a few other legal concerns before heading north and crossing the border. We've taken care of these things already including having a NEXUS card which allows you to simply call in your intentions to cross the border either way. This "trusted traveler" document is better than a passport in our case. We needn't make an out of the way stop to clear customs.We simply call a ohone number as we cross the border and let them know out intentions. They give us a number that we will use whenever it is asked for (we've never been asked for it except when crossing back to the U.S.)
Another odd butnecessay document is the DTOPS sticker. This Customs and Border Protection sticker must be in possession of any boat or aircraft crossing the border. I guess you'd call it a sort of tax that helps pay for inspections of vehicles entering or leaving Canada or the U.S. On a boat the sticker must be attached to a spot nearest to the entrance of the boat. We post ours on a window on the starboard side of the boat right around the corner from the entrance to the main salon. At any rate, it is easily visable to any law enforcement officer who may want to see it abd it needs to be visible. At only $27.50 this year (2017) it is far from a burden when the costs of owning a boat are usually given in terms of 'boat bucks' )one boat buck is tanslated as $1,000).
So, we are in the talking phase of our planning right now, while my mechanic is looking over the boat to see what needs to be done before we head anywhere. That will certainly include replacing the fuel filters, the oil and filters and the engine coolant. Now, times that by two! This has to be done on both engines in the engine room. The penalty for not doing it wil be a much bigger bill when something goes haywire on one or both of the engines while in the middle of who knows where. Not really worth it to ignore basic maintenance.
As our plans move along, I'll post more about our destination plans. However, one of the really cool things about cruising, like road trips, plans can change when you hear about some not to be missed anchorage during a conversation with another boater. So, who knows. The best laid plans!
Last summer we left the Key of Sea home and drove up to Port Mc Neill on Vancouver Island and boarded some friend's boat for a cruise through the Broughton Islands. We didn't gain much in personal confidence but were witness to our friend's confident ways aboard their boat.
Though we have no plans to venture as far as the Broughtons this summer, going it alone for the first time so far from home will surely be a mixed experience. We have a better idea of how o prepare to go, where we might want to go, how to plan and what to do when entering some of the more popular anchorages.
Speaking of anchorages, we have yet to anchor anywhere in Canada. Despite cruising there twice now, our cruising buddies have always invited us to 'raft up' to their much larger boat and hang out with them, often sharing dinner and using their dinghy when exploring an anchorage or going ashore. So, to a great degree, we've been the victims of parents who spoiled us and now we don't know how to confidently anchor on our own.
 |
| Typical stern tie to shore |
 |
| Our stern tie reel. Practical & cheap |
That final option of stern tying is a practice commonly used in Canada when anchorages become crowded and your boat's swing at anchor needs to be controlled. After dropping your anchor, you back down the boat towards the shoreline and tie off the stern of the boat to a spot on shore. This technique keeps your boat from swinging on the single anchor point usually used effectively providing much more room in the bay or cove for other boats to anchor. Often times you can identify these stern tie spots on shore in the form of a metal ring attached to a large rock or some other marking ashore indicating an appropriate spot to tie up. While tying to a tree on shore is tempting, unless it is dead, it is not acceptable as the line rubbing againat the bark can cause permanent damage over time. Another concern is making sure you have enough line to rech the shore and back. It is generally recommended to have 300 to 600 feet of yellow polypropylene line stored in a reel of some type. Yellow and polypropylene because it floats and makes it more visable of other boaters. We keep our line in a garden hose reel like the one above. It keeps the line out of the way when not in use and the top of the reel makes a nice table for drinks. We keep it between the two chairs in our cockpit so we can gaze out at the world, read and enjoy our coffee in the morning or a more powerful beverage at the end of the day.
As we are most comfortable tying up for the night in a marina, I am sure our plans will include a lot of these stops.heading north we have had great experiences such harbors as Sidney, Gorge Harbor, Montague Bay, Nanaimo, Ganges, Maple Bay, Chemainus, Telegraph Harbor, and Pirates Cove, just to name a few. Many of these spots have marinas with power and water, shopping and restaurants which, for the small cost of the moorage, gives you most of the comforts of home. It's also a place where you can do laundry, dispose of trash and recycling and get some wi-fi time.
 |
| Typical sewage layout |
 |
| Typical Y-valve |
There are a few other legal concerns before heading north and crossing the border. We've taken care of these things already including having a NEXUS card which allows you to simply call in your intentions to cross the border either way. This "trusted traveler" document is better than a passport in our case. We needn't make an out of the way stop to clear customs.We simply call a ohone number as we cross the border and let them know out intentions. They give us a number that we will use whenever it is asked for (we've never been asked for it except when crossing back to the U.S.)
 |
| DTOPS sticker minus the asigned number |
So, we are in the talking phase of our planning right now, while my mechanic is looking over the boat to see what needs to be done before we head anywhere. That will certainly include replacing the fuel filters, the oil and filters and the engine coolant. Now, times that by two! This has to be done on both engines in the engine room. The penalty for not doing it wil be a much bigger bill when something goes haywire on one or both of the engines while in the middle of who knows where. Not really worth it to ignore basic maintenance.
As our plans move along, I'll post more about our destination plans. However, one of the really cool things about cruising, like road trips, plans can change when you hear about some not to be missed anchorage during a conversation with another boater. So, who knows. The best laid plans!
 |
| The Key of Sea on the dock on Sucia Island |
Subscribe to:
Posts (Atom)